Time-lapse photography of clouds and other phenomena in the sky
Martin Setvak
Here are several basic recommendations for
setting-up Ricoh cameras for their best performance in the time-lapse
(interval) mode. The table and notes below address namely the Ricoh
GX100 camera (which I own), but can be applied to any other Ricoh
camera which offers the INTERVAL mode - in principle all the recent
Ricoh GX/GRD/GXR and R/CX series
models. The manual exposure mode (M) is applicable to
GX8,
GX100,
GX200,
GRD,
GRD2, GRD3,
GRD4,
GXR-system
(with any of its modules) and Ricoh
GR cameras only, while all the other settings can be applied even
to the R and CX cameras:
R3,
R4,
R5,
R6,
R7,
R8,
R10, CX1, CX2,
CX3, CX4, CX5 and CX6
(some of the settings under slightly different terminology or camera
menu shortcuts).
The interval mode of all of the cameras listed above
starts at 5 seconds (it is the shortest possible interval), and it
is also a basic increment of this mode (you can set the interval to 5,
10, 15, 20, ... seconds, up to 1 or 3 hours, depending on the
model). In March 2012 Ricoh has upgraded
firmware of its GXR-system cameras, enabling
a 2 second interval with this
camera and all of its units. The most recent Ricoh
GR enables even shorter interval starting at 1 second. There is no
software-enforced limit for the total number of images you can take in
the interval mode. These features make the Ricoh cameras unique on the
present market, no other compact camera manufacturer offers such
combination of parameters in the time-lapse mode.
All the recommended settings below are "tuned" to
give the best results when shooting the skies - clouds and other
atmospheric phenomena, which are at infinity. Therefore
those who plan to use the Ricoh cameras for other types of time-lapse
movies should not follow these recommendations thoughtlessly :)
Optimum Ricoh GX100 setup:
SHTG
STGS Menu
(Shooting Settings) |
Recommended
settings: |
Comments: |
| PIC
QUALITY |
F3:2
(9M) or F3648 (10M) |
These are the only two settings I use. Of
course, keeping in mind that the final movie is at much lower
resolution, you can shoot at lower resolution right away. However, I
prefer the larger size since it gives more freedom for post-processing
of the images before assembling the movie file (e.g., rotation to
adjust the horizon, removal of parallax distortion of buildings,
cropping the images if needed, etc.).
|
| FOCUS |
∞
(infinity) |
Everything is at infinity, so why forcing the
camera to re-focus for each frame? This saves not only the camera
battery, but also the lens assembly mechanics. Be sure to test the
infinity mode first, right after you purchase the camera. Occasionally
some problems with accuracy of this setting were reported (the camera
producing sharper images when in AF mode as compared to the infinity
mode); if that is the case try either replacing the camera or
correcting the problem at your Ricoh service.
|
| AE
METERING |
CENTER
(weighted) |
In most cases this gives somewhat better
results than the MULTI mode. I'm not quite sure what are the algorithms
used by Ricoh, but MULTI mode seems to be producing more flicker than
the CENTER weighted one (when shooting in other modes than M). However,
in some cases MULTI mode can give better results - if you are not sure
which one to use try both in advance (under the same circumstances) and
select the one which gives better results.
|
| WHITE BALANCE |
CLOUDY |
Leaving the camera in AUTO WB mode may result
in more flicker than any of the fixed modes. OUTDOORS seems to produce
"cooler" pictures, in CLOUDY mode they are "warmer", and seem a bit
more "natural". But this is only my personal "taste"... In any
case, both of these modes require some level of color adjustment when
post-processing the series.
|
| ISO SETTINGS |
ISO 80 |
Just to reduce the image noise... When shooting at low light,
you may go somewhat higher - perhaps up to ISO 200.
|
| CAMERA SHAKE COR |
OFF |
In some cases, leaving the camera shake
reduction ON (while on a tripod) may result in certain "jumps" or
vibrations of the image position. However, I had this experience myself
only once, while testing R6, never tried this with GX100. Of course,
setting this function to OFF saves also the camera energy. Moreover,
when the camera is attached to a tripod, there is no need to use this
function.
|
| SETUP
Menu |
|
|
| VOL. SETTINGS |
All sounds OFF |
Saves the camera energy; you can hear the
shutter noise anyhow, even without any artificial sounds...
|
| LCD CONFIRM. |
0.5 or 1 SEC. |
Just to give you some real-time control of a scenery you are
capturing. Can be switched off entirely (should save some extra
energy).
|
| Other
settings |
|
|
| MODE DIAL |
M (Manual Exposure Mode) |
Whenever possible, try using the M
mode. When the variable lighting conditions do not allow using the M
mode, use one of the A or P modes instead, in
combination with AE Metering set to CENTER (see above). For further
comments on aperture settings see the aperture note below. With R10,
CX1 - CX6 cameras you can bypass the absence of M
mode by using the AE Lock before starting the timelapse
sequence (unfortunately there is no AE Lock on the older R
models).
|
| DISPLAY |
HISTOGRAM |
May be helpful when shooting in M mode under
variable lighting conditions (e.g. at sunsets). When shooting in M
mode, you can even change the shutter speed and aperture when the
interval sequence is running (requires a rock-solid tripod).
|
| VF/LCD |
LCD OFF |
When the EVF is not attached to the camera,
this button switches between LCD ON and OFF. On the R series
cameras this can be achieved by DISPLAY button set to OFF. Setting the
LCD OFF saves the camera energy; however when needed you can switch it
ON and OFF even when the interval sequence is running (requires a
rock-solid tripod).
|
Aperture note: When shooting in the M or A
modes, set the aperture to F/5.7 at the most (at 24mm). Higher aperture
values (F/6.5, F/7.2, etc.) result in lower image sharpness and
contrast due to diffraction effects on the small diaphragm. Optimum
aperture at 24mm is F/5.1, it gives the best overall image sharpness.
Battery capacity: With the settings above you
should be able to take (with GX100) up to about 2400 images before
exhausting the battery (this applies to the original DB-60 and
compatible batteries which I use). I have no experience with other
G-series cameras; with R-series it is somewhat less (about 2000 images
- probably a result of measuring the exposure for each frame, and also
a different battery type). The actual number of the images strongly
depends on the environmental temperature - you will get less images at
lower temperatures, and state of the battery (be sure to have it fully
charged before you start). After two years (and about 200,000 images,
taken mostly in the interval mode) my batteries have lost about 1/3 of
their capacity. Alternatively, you can use the AC adapter, but you need
110-220 V for this (beware that not all the R-series cameras
support the AC Adapter). Only the GX8 has a possibility to replace the
battery (and memory card) when attached to a tripod. It appears that the battery gets exhausted in the
interval mode after about 2.5 - 3 hours, regardless of the interval you
use. Thus, the numbers above apply to the case when you use the
5 s interval. Using a longer interval will NOT prolong the total
period of the sequence, you will end up at similar limits (2.5 -
3 hours) as with the 5 s interval. To gain longer
periods, you may try the higher capacity DB-65 battery.
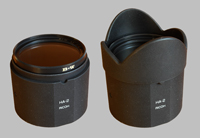 |
Lens hood and filter: When
"timelapsing" with my GX100 camera, I almost always use the lens hood
adapter HA-2 with a protective filter (B+W UV 43mm MRC
filter). Though a filter may reduce marginally the image quality, it
protects the lens assembly from dust and moisture when taking longer
sequences. To reduce flares when shooting against low Sun, I purchased
the rather expensive filter above, with high-quality multi-coating (be
very careful with this, don't shoot against the Sun when it is higher
at sky, thus much stronger - it might damage the camera sensor !!!).
Since the original paper box for the HA-2 and for the hood is rather
impractical, I made my own "travel case" for these - made from a
plastic container of soda (saleratus) tablets, see these images: 1, 2 and 3. This way you can
have your HA-2 with the hood and a protective filter always ready
(mounted together) and clean. You can try asking for similar plastic
boxes either at pharmacies or drugstores, I found the one with soda
tablets at a supermarket.
|
Movie flicker: Even with the manual settings
above, you will most likely get a little bit of flicker, abrupt changes
or jumps in the overall luminance or color balance of the images
(namely on the blue sky). When in the P or A modes (or when
"timelapsing" with the R/CX series) you are likely to get stronger
or more frequent flicker. To eliminate the flicker, I use Donald
Graft's
Deflicker Filter
for VirtualDub;
details on using these can be found in my "step by step guide".
Memory card notes: If you intend to take
longer series at larger or full image size, be sure to use the SDHC
cards (already available up to 32GB). From the cameras listed at the
top, only the R6, R7, R8, R10, CX1 - CX6, GX100, GX200, GRD2, GRD3 and
GRD4 cameras, the GXR system and the most recent GR camera support this
type of cards; all the other cameras can be used with the standard SD
cards only (up to 2 GB). Preferentially use the "Class 6"
cards, however even the cheaper ones of these are sufficient for
time-lapse purposes. A table with tested cards and their write speeds
can be found
here.
Continuous mode: you can also use the
continuous mode (CONT=ON) instead of the interval mode, gaining much
shorter intervals. For notes on this please go here.
Back to the main page
(Eng.)
Zpět na hlavní stránku (CZ)
